Last updated:11-27-18

Welcome to Pi-Care, a “Pi-Star” IMAGE restoration self care page
*Trouble Shooting and General fine tuning adjustments are below the restoration instructions.
VIDEO
*** Courtesy of ~ Mr. Adam McCarthy / Sydney Australia (An outstanding tutorial following the steps below)
https://www.dropbox.com/s/ossg6mlbkxpy5ga/RuggedSPOTMovie.mp4?dl=0
PREFACE . . .
*** PC Pi-Star LOG IN: http://pi-star/admin ( ONLY after machine completes the FULL command line “boot up” sequence )
*** MAC Pi-Star LOG IN: http://pi-star.local ( ONLY after machine completes the FULL command line “boot up” sequence )
After 600++ successful PiStar set up’s, we see the same simple mistakes being made by customers to connect to WIFI.
1. NO special characters or spaces in SSID/PASSWORD fields.
( Failure to follow this rule to the letter can corrupt Pi-Star image on the very first boot up !!! )
2. ALL lower case is the “SAFE” and highly successful RULE for SSID/PASSWORD fields.
( Failure to follow this rule to the letter can corrupt Pi-Star image on the very first boot up !!! )
3. MINIMUM 8 digits and/or alpha combinations in the SSID/PASSWORD fields.
( Failure to follow this rule to the letter can corrupt Pi-Star image on the very first boot up !!! )
4. Pi-Star LOG-IN must be ALL “LOWER CASE” ONLY !!! ( pi-star / raspberry )
5. Customer supplying us with the wrong SSID and/or PASSWORD fields and thus corrupted their perfect Pi image on the very first boot up has been rare, but a pervasive issue with aprox. 2% of our customers! (this should be 0%).
Please remember that DMR MODE PLUG & PLAY READY requires all WIFI SET UP rules are followed to the letter and all data is 100% perfectly accurate and perfectly correct for 100% plug and play SUCCESS to happen first time, every time with our custom built machines ![]()
- Make a folder on your desktop called “PiFix”
- Go here and download the FREE SD card formatter: https://www.sdcard.org/downloads/formatter_4/
- Go here and download the FREE etcher program: https://etcher.io/
- Install both programs above and place a shortcut for each in the “PiFix” folder
- Go here and download the FREE Pi-Star image: https://www.pistar.uk/downloads/
- Download: Pi-Star_RPi_V3.4.11_17-Mar-2018.zip ( or the most latest version available)
- Save the Pi-Star image in the “PiFix” folder
- Select the Pi-Star_RPi_V3.4.11_17-Mar-2018.zip and extract into the “PiFix” folder
- Only the .IMG file is needed, delete the other file after extraction
- Go here: https://www.pistar.uk/wifi_builder.php Enter your SSID & Password, submit, save to “PiFix” folder
- SSID ~ MINIMUM EIGHT (8) alpha and/or numbers ONLY / NO spaces and absolutely NO SPECIAL characters ALLOWED !!!
- Password ~ MINIMUM EIGHT (8) alpha and/or numbers ONLY / NO spaces and absolutely NO SPECIAL characters ALLOWED !!!
- You now have a wpa_supplicant.conf file with your SSID & Password, SD formatter, Etcher, and a fresh PiStar image in your “PiFix” folder, all the elements required to make a fresh new clean Pi-Star image.
- Insert your micro SD card into your computer and QUICK format with SD formatter, remove card.
AMAZON.COM has many inexpensive SD card readers and adapters . . . .The reader below has a MICRO SD slot, adapter (center image) not required. 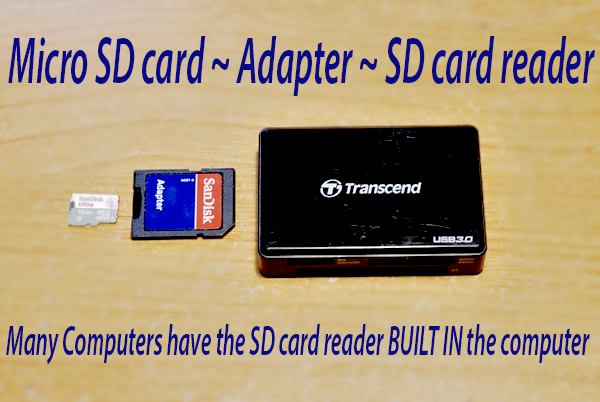
- Open ETCHER, RE-INSERT the micro SD CARD, follow the prompts from left to right to ETCH the Pi-Star image in your “PiFix” folder and wait till complete 100% complete and validated, 3 to 5 minutes typically.
- Remove micro SD card, re-insert micro SD card into computer, drag the wpa_supplicant.conf file with your SSID and PASSWORD directly into the ROOT directory of the SD card, now called “BOOT”
- EJECT the micro SD card and INSERT into device, you now have a FRESH PI-STAR IMAGE.
- TURN ON the device matching the SSID & Password you entered into the wpa_Supplicant.conf file.
- Log into the same device now with your computer.
- POWER up the device and WAIT 3 to 5 minutes.
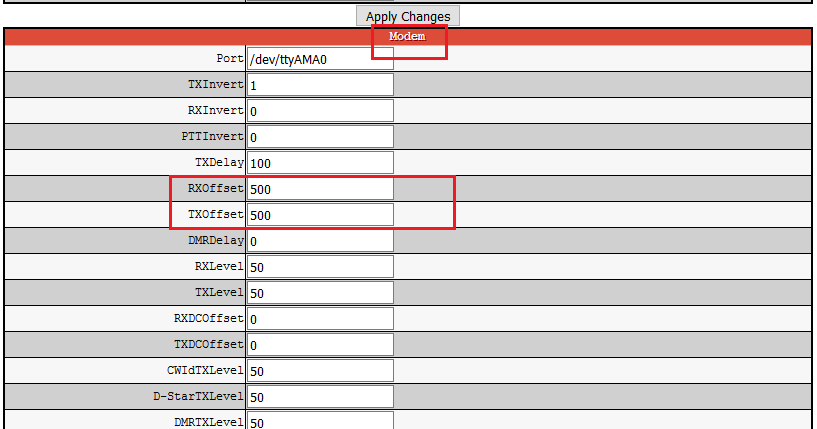
- Go to your browser and enter: http://pi-star/admin/expert/edit_mmdvmhost.php
- User Name: pi-star Password: raspberry (case sensitive !!!)
Note: RPi will only accept “pi-star / raspberry “ in LOWER case - Go to MODEM area, enter -475 (not 500) in the exact same TWO fields below, SAVE.
- Go to configuration area in the pi-star dashboard
- Enter your information starting from the top down
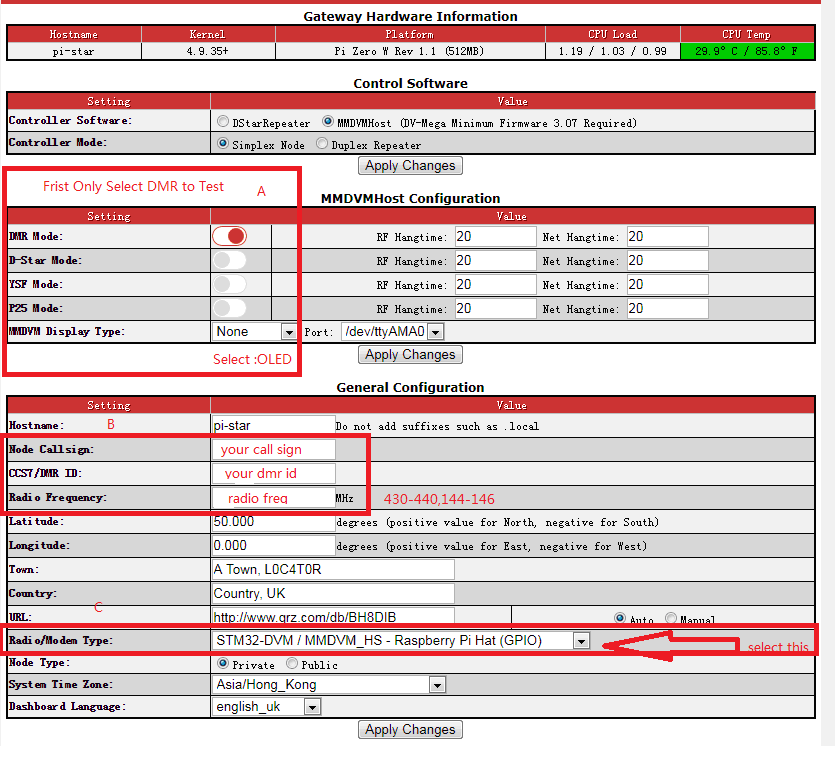
- SAVE /Apply changes
- ENTER your DMR ID NOW
- SELECT A BRANDMIESTER SERVER CLOSEST TO YOUR QTH in the dashboard, SAVE
- Double check ALL settings you entered to assure all is 100% correct
- CC times slot #1 must be selected
- Pi-Star is always on time slot #2
- SAVE AGAIN
- RE-CHECK ALL SETTINGS one more time and be sure your radio is set to the same applicable settings
- DO NOT CHANGE ANY OTHER SETTINGS at this time !!!!!
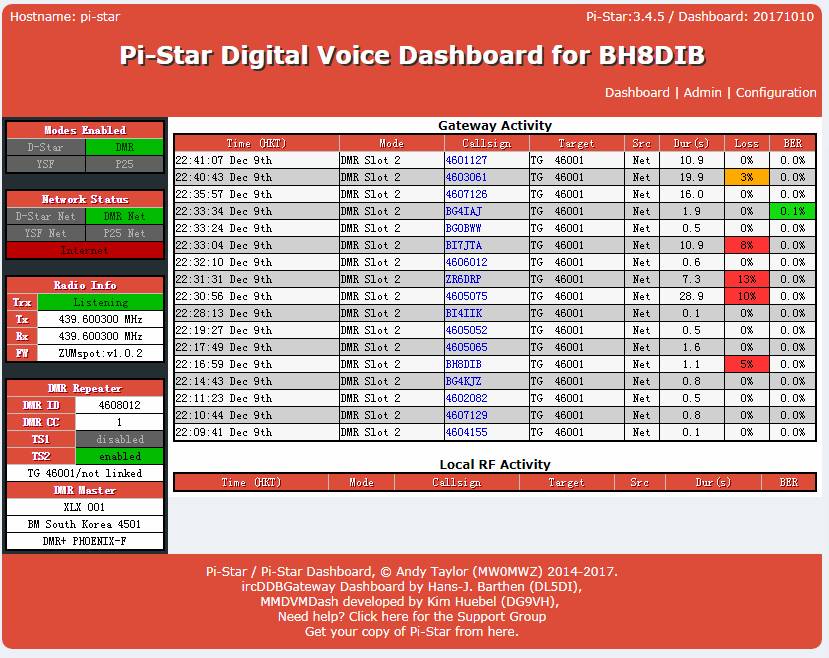
- If you entered ALL the correct information into Pi-Star, the 4 GREEN fields below will be ACTIVE.
- GO TO BRANDMIESTER “SELF CARE” and sign in, check to see your modem has a GREEN plug.
- https://brandmeister.network/?page=login&returnurl=%2F%3Fpage%3Dselfcare
- BACK UP YOUR CONFIGURATION “BACK UP & RESTORE” into the “PiFix” folder so all your settings will be saved for any future needs to restore in seconds from now on.
- SUCCESS, enjoy . . . .
Trouble Shooting and General fine tuning adjustments
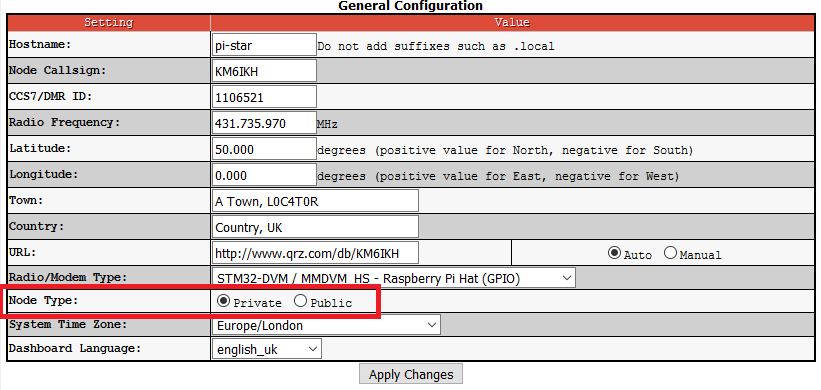
03-30-18 update . . . A few of our customers had to change the settings below from the “PRIVATE” default settings we test on here with the TYT MD-380 using a Android Smart phone that PASSES testing here in the LAB.
ALSO CHECK . . .

All our SPOT models are 100% tested before shipping and have PASSED. This said, each users radio transceiver may require certain fine tuning adjustments as transceivers of different brands and models have their own individual characteristics and thus occasional fine tuning in the Pi-Star software may be required. We test all units with the MD-380, and the reason we do is this particular transceiver has been known to be quirky with hot spots in general of all brands and models in fact, and sensitive to set up adjustments. So our testing procedure with the MD-380 transceiver, being notoriously quirky with HOT SPOTS in general assures that 95%+ of all other radio Brands and Makes should mate up with the Covert Spot, XD4 Spot, and the Rugged Spot with no complications and little if any fine tuning at all in the Pi-Star software.
Occasionally, the customers radio transceivers have settings that do not match their supplied setting instructions we were given to program the Hot Spots (Internet Gateway Devices) which are “COPY & PASTED” directly into the Pi-Star dashboard interface directly to avoid any possibility of typos’ on our side in the DMR programming set up proceedure.
The 5 most typical and common basic issues (discrepancies) in customer supplied data are . . .
- Incorrect SSID supplied – Can glitch and corrupt Pi-Star image !!!
- Incorrect PASSWORD supplied – Can glitch and corrupt Pi-Star image !!!
- Radio transceiver Color Code not matching transceiver (default is 1).
- Radio transceiver Time Slot is set to 1 (Pi-Star ALWAYS uses time slot 2).
- Radio transceiver frequency not set to the exact customer supplied simplex frequency pre-programmed into Pi-Star.
The 5 honest and human mistakes above account for 99% of the few and far in between and rare issues that pop up and create cascading complications. #1 and #2 in particular typically require a customer start from square one and re-IMAGE their micro SD card from scratch due to file corruption by starting from the very top of this page to re-start with a clean slate, which is the exact same STEP by STEP A to Z procedure we use here in the lab to create every fresh Pi-Star IMAGE for customers machines.
CAUTION: It is always wise to NOT change ANY Pi-Star dashboard adjustment other than the SPECIFIC adjustments indicated in the set up information starting from the top of this page, unless you are very familiar with PI-Star and the dashboard interface adjustments, and how they effect and can adversely effect the performance, functions, and interoperability between the machine and your radio transceiver !!!
Please standby . . . we will be adding images BELOW of the PI-Star dashboard (section by section) with the typical trouble shooting solutions and fine tuning adjustments which may be required for your specific transceivers brand, make and/or model.
END