
UPDATED: 09-26-19
Trouble shooting should be virtually non-existent with a fresh new “NEX-GEN” Hot Spot which will be up and running (in DMR mode) straight out of the box, providing the customer supplied programming instructions (printed copy is always in the box) 100% correct and accurate. All other modes are a very basic set up which takes 3 to 5 minutes tops.
We COPY/PASTE customer supplied programming data directly into pi-star which 100% eliminates any and all possibility of any typo’s in the custom programming phase, which is done just before shipping.
*** If running more than ONE hot spot, turn ALL your other hot spots off before booting up a “NEX-GEN” for the first time !!!
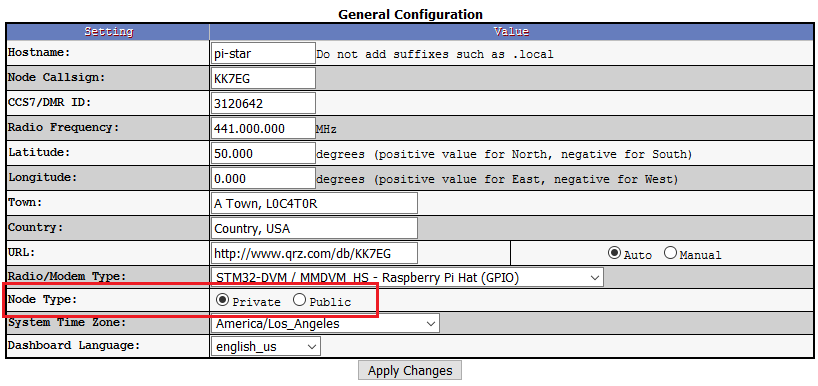
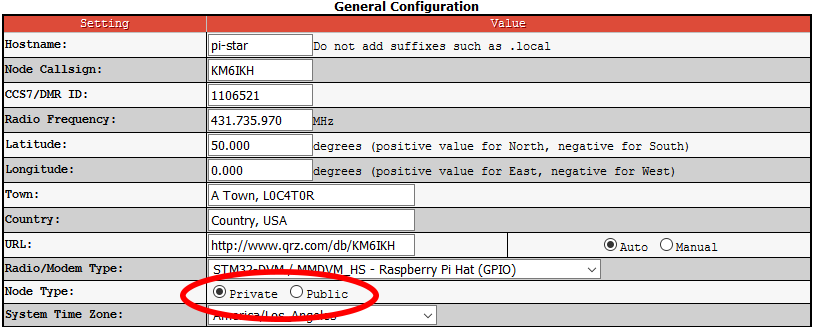
After turning off all other HOT SPOTS and seeing that your NEX-GEN machine is in fact running perfectly, the NODE TYPE will need to be set to PUBLIC (not private) in order to run multiple hot spots, and you DMR ID will need to have TWO additional digits (7+2) added to uniquely identify each individual hot spot with BRANDMEISTER SERVERS, ie: 123456701, see the NODE setting below.
***** A MINIMUM USB power supply if 1.5 amps is required, cell phone chargers and computer USB ports are not the correct power supply. Good quality “Auto USB adapters” are typically very good power supplies for NEX-GEN Hot Spots.
We strongly suggest READING ALL BELOW TO THE END “BEFORE CHANGING ANYTHING” !!!!
*** You must SAVE any and all settings in pi-star BEFORE they will take effect !!! ***
See the programming sheet you returned to us, printed out and in the box, and see if there are any discrepancies, the SSID is always a prime suspect.
So the very first thing to check if your HOT SPOT is not working straight out of the box is: Determine what item(s) below may be incorrect and therefore blocking access to passing a radio signal to the Brandmeister server(s)
*** Be sure you have a 100% fully charged (topped off) battery in your HT to start with.
*** Be sure you have a GOOD solid power supply to the “NEX-GEN” Hot Spot machine.
- A dedicated USB power strip or wall wart is best with a minimal of 1.5 amps rated power output.
- Computer USB ports can be buggy and have been know to cause problems with both insufficient power supply and erratic power supply issues ( we suggest not using a computer USB port as a power source).
- USB power converters that plug into a vehicle cigarette lighter socket are typically reliable, but can fail with heavy use and may need to be replaced every 12 to 18 months.
- Mobile “Stand Alone” battery power packs should ALWAYS have a VOLTAGE regulator built in with a LOW voltage cut off (minimum 3v low power cut off recommended) in order to avoid damaging the electronics and display screens on NEX-GEN Hot Spots.
- Cheap Chinese “UNREGULATED” USB battery power supplies should never be used as they can damage the sensitive NEXTION display screens and other power sensitive electronic components as they have no low power (low voltage/low amperage) cut off circuitry required to protect your NEX-GEN hot spot from low battery power damage.
- Simple DIY power regulators can be built that maintain a consistent 5v power supply with input power as high as 16v, and maintain a consistent 5v output with a low as 2v input external voltage, and have adjustable power output “cut off” regulation capability which protect sensitive electronics (when adjusted correctly). They are typically known as BOOST/BUCK converters.
- 433.000 MHZ is the resonant SWEET SPOT for NEX-GEN Hot Spots, so keeping within 2MHZ above or below this frequency is advised.
The 12 sections below cover all the pi-star “usual suspects”
SECTION 1
*** Pi-Star configuration page . . . Check and verify all the “low hanging fruit” basics first.
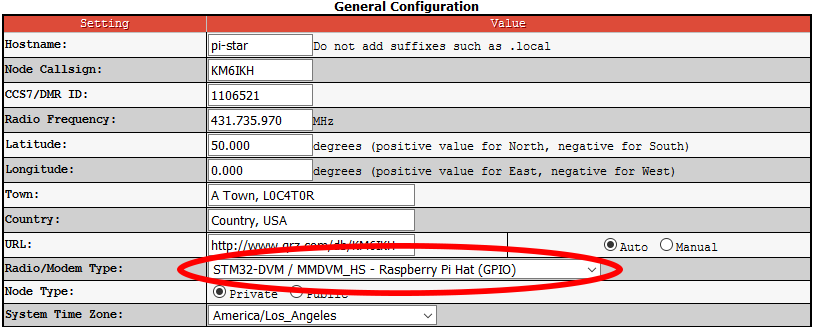
- Call sign (as is entered in your transceiver)
- DMR ID (100% required to handshake with the Brandmeister server(s), as is entered in your transceiver)
- Frequency (simplex), (as is entered in your transceiver)
- Color code #1 (as is entered in your transceiver)
- Time slot #2 (as is entered in your transceiver)
- SSID (router and/or phone internet access)
- Password (router and/or phone internet access)
SECTION 2
Check your DMR code plug basic set up . . .
- Squelch must be as low as possible
- Group call – not private
- Frequency: must match HOT SPOT
- Band width: 12khz Wide, not narrow
- Color code: #1 must match HOT SPOT
- Time slot: #2 must match HOT SPOT
- LOW power, 1 watt MAX is always best practice
Known radio issues . . . (this is covered in the modem offset section down the page)
*** GD77 DMR HT Radios may require the modem offset be set to “ZERO” TX/RX
We will be adding data below over time, but the basic set up of a “NEX-GEN” is simple, and any issues are always very minor and quick to fix, “if and when” they arise. It is typically something super basic and simple to fix 99.9% of the time.
Tips and tricks . . . SAVE after each change; if no improvement was noted, change that setting back and SAVE again before trying the next adjustment.
SECTION 3
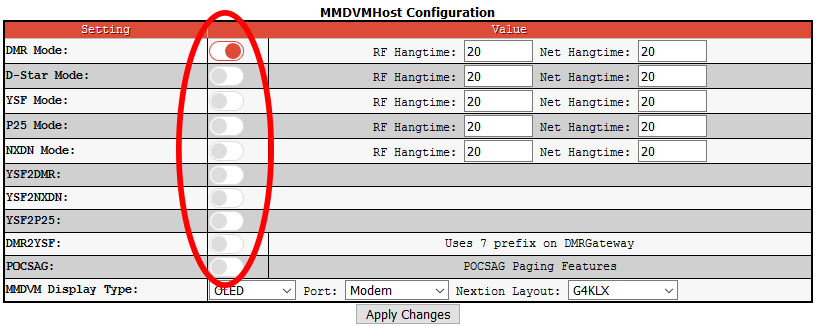
MMDVMHOST Configuration page . . .
Only activate “ONE SINGLE MODE ONLY” whenever troubleshooting !!!
SECTION 4
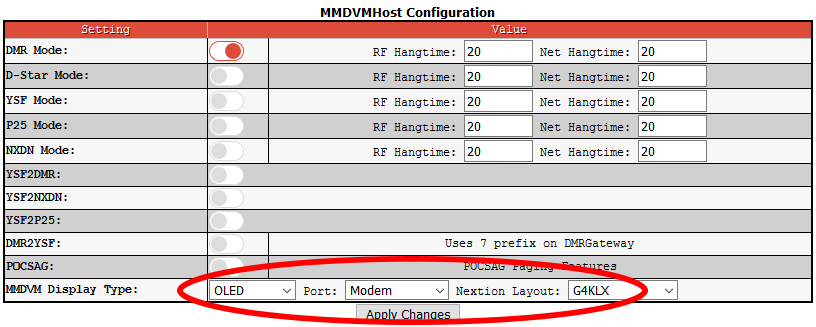
OLED settings . . .
SECTION 5
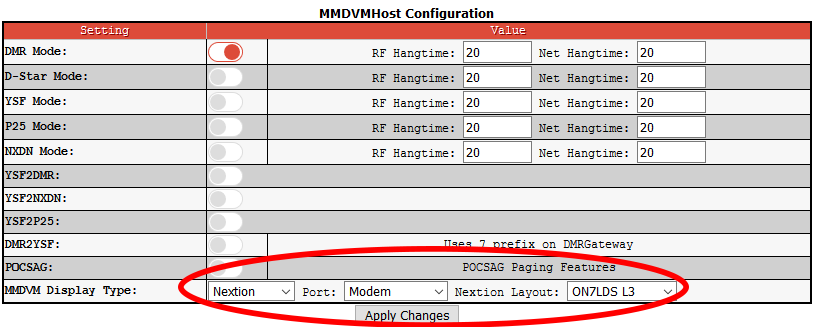
NEXTION screen settings . . .
SECTION 6
Modem Selection (all “NEX-GEN” Hot Spots) . . .
SECTION 7
NODE TYPE – Single HOT SPOT = PRIVATE should work just fine.
……………………….Multiple HOT SPOTS = PUBLIC setting.
SECTION 8
Select a server closest to your local area / QTH.
There are currently 4 USA servers.
.
3101 New York, NY
3102 Dallas, TX.
3103 San Jose, CA.
3108 Atlanta, Georgia
.
Changing a server can be a quick fix if Brandmeister is working on a server; it is typically “OUT OF SERVICE” for the duration of the service.
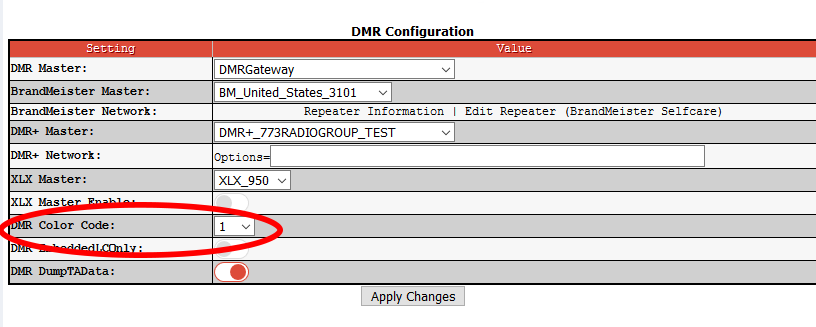
SECTION 9
Color Code: Default is #1, this MUST match your radio code plug.
Note: TIME SLOT #2 is automatically a PI-STAR default, be sure your radio code plug is set to TS#2.
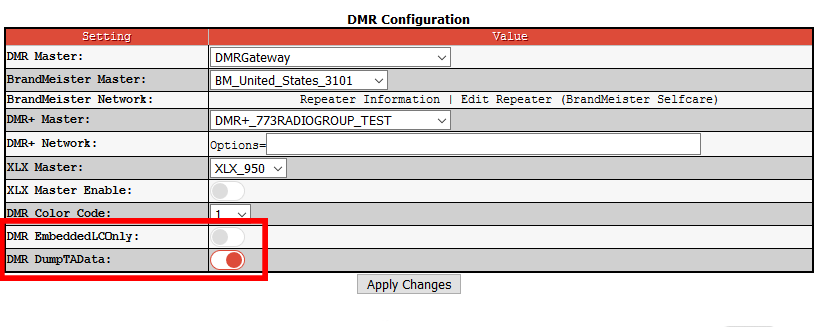
SECTION 10
EMBED / DUMP settings. These are on/off settings.
EMBED is specifically for CHINESE radios which can be buggy, try each setting.
DUMP is typically not an issue, but give the other setting a try.
SECTION 11
Wireless Config.
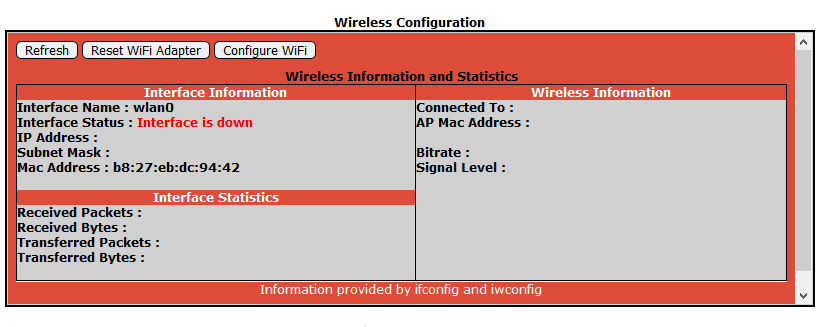
If you see the screen below, you are either HARD WIRED with a cat5 cable into the back of your ROUTER, or your SSID and/or PASSWORD is not correct if it is your express intention to connect via WIFI (ie; use your phone as an internet connection for mobile function; FYI ~ also happens to be called a hot spot).
Options . . .
1. REFRESH
2. RESET WIFI ADAPTER
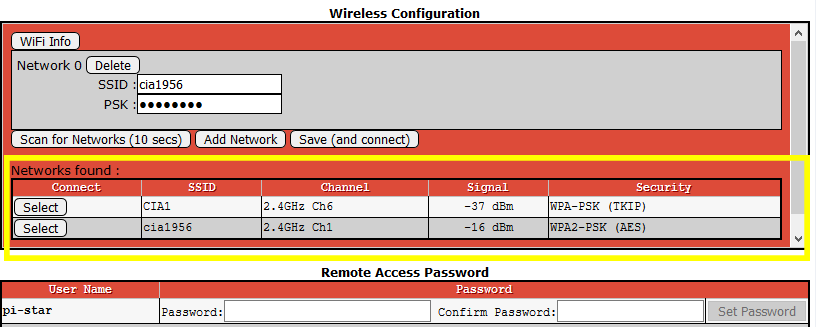
3. CONFIGURE WIFI (SEE BELOW)
4. *** See my interactive “recorded video screen capture” for this set up here: https://hamradio1.com/wifi-set-up-in-pi-star
If you hit CONFIG WIFI button on the top right above, the window below will appear giving you a chance to RECONNECT with your selected WIFI(s).
*** Select the Scan for Networks (10 sec), then all the available NETWORKS FOUND fields as seen below will appear. Select the WIFI network you want to have Pi-Star search for on every boot up, and when transitioning from one WIFI connection to another, which pi-star will do automatically, providing it is listed in the WIFI connections list you have built. All you will need to do after hitting the SELECT button is enter the correct password, then SAVE.
SECTION 12
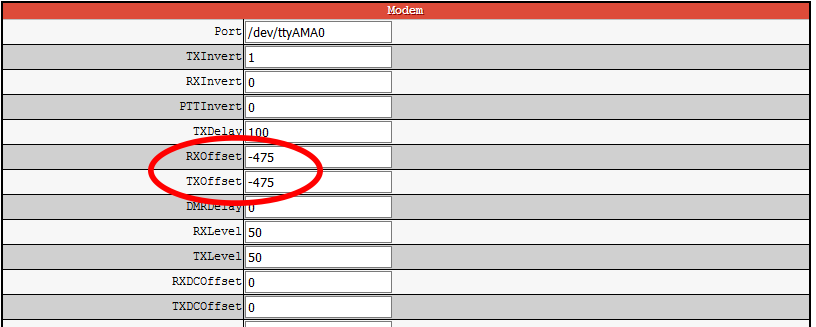
MODEM OFFSET
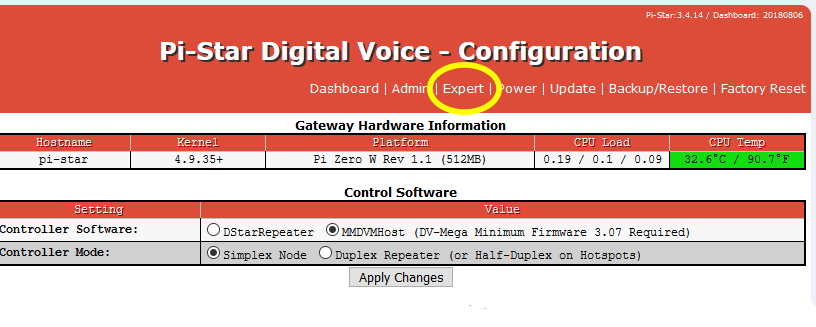
Step #1 select EXPERT from the config page.
Step #2 Select ~ MMDVMHost
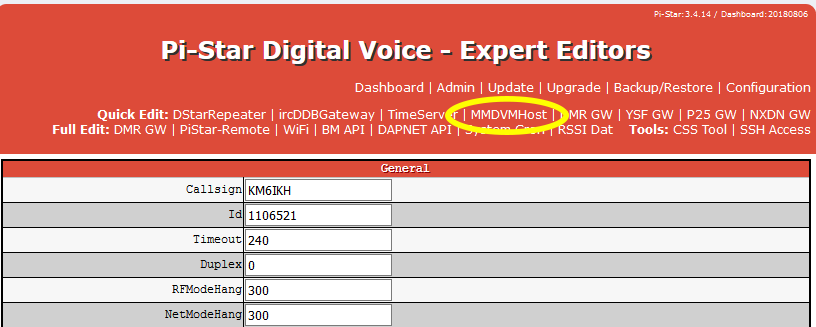
Step #3 Scroll down to MODEM area, then you will see -475 as the TX/RX offset setting.
Well, this is where things get interesting. . .
Currently, -475 is where we set these boards based upon factory specs, however, certain Chinese radios may require a different setting; although 98% of radios will perform perfect at this setting. We ran across only one GD77 radio that required TX/RX be set to “ZERO” and then all was humming perfectly.
If these two mission critical settings are not liking your Chinese transceiver, this can be the only reason your transceiver is not passing a signal to and/or from the Brandmeister servers !!!
Typically BOTH TX/RX settings should match, but again, there can be exceptions, but these are ultra rare.
NOTE: If you are 100% positive all the above settings have been checked and then double checked, perhaps even triple checked, and you do not see the yellow/amber PTT LED go on when looking at the top of the MMDVM HAT board, it is just about 100% this setting will require adjusting, but again, this is ultra rare and almost never required, with the exception of one customer with a GD77 Chinese transceiver that required a “ZERO” setting in both fields, at which time his radio started working perfectly.
Moving the offsets in increments of 10 UP AND/OR DOWN is the conventional wisdom here, but it can take some time and patience if this is your last resort, and keep in mind, a BAD TRANSCEIVER may be the underlying problem, so we strongly suggest trying another transceiver before spending potential hours here making micro adjustments in this section 😉
We discovered a very effective short cut is a -300 TX/RX setting, check the BER RATE, and adjust from there. You want to see a 0.3+/- BER RATE, this is the sweet spot. We routinely fine tune NEX-GEN Hot Spots on the bench as we are programming, and the above method nails the sweet spot BER RATE typically in under 1 to 2 minutes 🙂 Keep in mind each transceiver may require it’s own target calibration, but this is not generally necessary.
END